Tuesday 27 October 2015

CASEing Kelly Blog Hop

Hello,


As you may know, Kelly Latevola from You and your big dreams, has this awesome thing in her blog. On almost every Monday, she has a new crafter, cardmaker featured at her blog. Firstly, she introduces the crafter through this little Q&A portion. (Always a lot of fun to read) and then she features three cards of the other crafter and based on those three cards, Kelly makes a CASE of her. Doesn't it sound a lot of fun and for moreover doesn't it sound the most kind thing in the crafting world? And this amazingly selfless thing that she does is called CASEing Genius.

Kelly started CASEing Genius a year ago - actually exactly a year ago. We, who has gotten the honour to be featured wanted to give a humble thank you to Kelly and congratulate her on her first anniversary of her blog feature. At least, I personally find the thing she does, is so amazingly selfless, kind and caring gesture to another human beings. This world needs more things like these - more acts of kindness. So, to say thank you to Kelly, we decided to organise a blog hop for her and to do the thing she has done - for her. In her feature, she asks the other crafter to send three cards, but we wanted this to be a surprise (Kelly loves those) so we chose three cards of hers and made a CASE based on those. So here are three cards that I found extra special in Kelly's production:


This was my first touch to Kelly's work. I saw this over at the CTS and well deservingly this was the winning card for that week's sketch. Isn't this just fabulous..?!? Love the design, the colour choices and those little black dots are.. all perfectly executed and all in their right place.


This was another wow! WOW! The frame is just splendid idea! Perfect colouring, striking colours and still yet so simply CAS. In perfection.


In my opinion, this card features Kelly at her best: she's the megatalent of using bright and bold colours without making the card look too grouded. Her colouring is fabulous and the dimension she achieves with her copics makes me want to envy her. And the last one but not the least, she always - and this is truly always - her background is super cool although it stays on the background. 

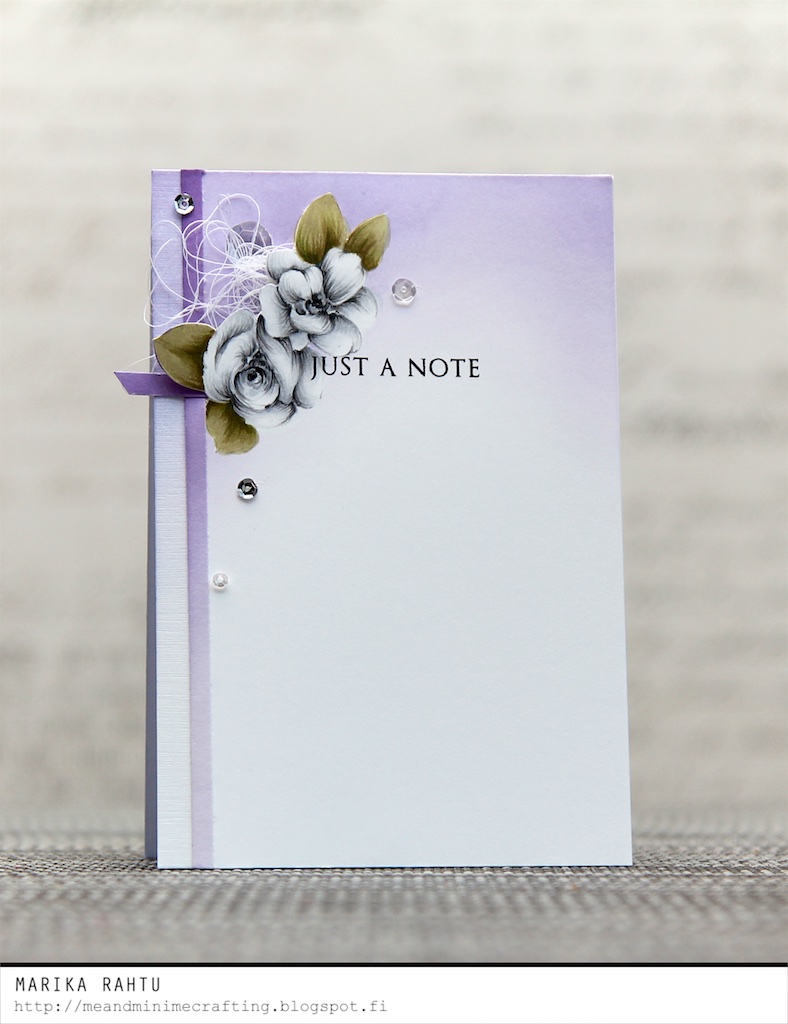
So I studied these hard and this is what I came up:

THE CASE


Well, I never can achieve the brightness of colours as Kelly has - but I tried. The rose is coloured firstly with copics and then later added details with coloured pencils. Kelly uses stencils quite often, so I went against my true nature and fought with a stencil and got out a decent execution. (Have you seen a card with a stencil from me.. not many because I really can't make them work - this being the exception to the rule.) And then I tried to come up with an idea for a frame. Kelly is fond of one-layer cards so I wanted to keep this one layer so I shaded the frame with copic markers and colours spencils. I hope you like it and I do hope you like it too, Kelly! You are a wonderful source of inspiration and your kindness really makes a difference!  

GIVEAWAY


What is a blog hop without some fun prizes?! Leave a comment by 11:59 pm EDT on Thursday, October 29th along each stop in the hop to increase your chances of winning a prize from one of our sponsors: 

Winners will be notified by email after October 29th.

GET HOPPING

If you are hopping you should have come from very talented Maria's blog and your next stop will be Martha Lucia Gomez. I included the list of all blogs in this hop if you get lost on the way. 


Marika Rahtu <--- YOU ARE HERE
Thank you so much for stopping by! Have fun hopping and good luck with the prizes! 

Hugs,
Marika

Monday 26 October 2015

Snowflake Grove - A new release from Purple Onion Designs

Hello,


Today's the day that all POD fans have been awaiting for - A new release from Stacey Yacula is available. The new release is called The Snowflake Grove and currently you can get the whole release just $100 until 11/4/2015 or you can buy your favourites separately.  I had tons of fun with these stamps and I'll be sharing my examples within next two weeks. 

For my first card I used Birch House stamp and when I saw it for the first time it figured that if there was a house at the North Pole, that is what it would look like. Since Christmas cards are usually sent in bulk, I tried to keep the design simple enough to be easy to reproduce. 


Stamps used: Birch House and Handwritten Holiday.

First, I coloured the base layer with copic markers that I have listed below in the supplies list. Then I added a bit of details with Faber-Castell Polychromo Coloured Pencils. I blended the sky with ink blending tool and used Distress Inks for blending. I let it dry completely and the I used a stencil to create the snowflakes. I stamped through the stencil with Versamark and then heat embossed the snowflakes with a white glitter embossing powder. They look really neat. I added the snow on the ground with the same technique but used my Versamark pen for it. The die cut panel is popped up with fun foam.

Supplies:
Stamps: Birch House and Handwritten Holiday by Purple Onion Designs
Inks: Memento Tuxedo Black, Versafine Onyx Black, Faded Jeans, Stormy Sky, Chipped Sapphire, Peacock Feathers Distress Inks, Versamark.
Dies: Die-namics Pierced Rectangles by MFT
Stencil: Falling Snow stencil by SSS
Embossing Powder: Vanilla White Opaque and White Twinkle Embossing Powder by WOW!

Copic Markers: Green: YG03 - YG67, Grey: 0 - N1 - N3 - N5, Brown: E43 - E44, Yellow: YR21

Thank you so much for stopping by today and leaving me such a kind comments on my last post. I've read the through I truly appreciate your kindness. Thank you! Have a great day!

Hugs,
Marika

Friday 23 October 2015

Altenew and Pretty Pink Posh Blog Hop

Hello!

Today I'm participating an awesome collaboration of Altenew and Pretty Pink Posh. You probably just came from Lisa Elton's blog if not, please start at the beginning from Altenew blog and hop along and have many chances to win prizes along the way.


A few week's back I made my first shaker card and I had so much fun making it so I decided to try to make another. I used a co-ordianting die to cut my shaker window and I used the same die to cut the shaker "space" from fun foam. I found that making a shaker card this way was very easy since you can just glue the layers together. So here is my card:


I made this into a video tutorial. You can watch it here or in HD in Youtube.


Supplies:
Stamps: Bejewelled and Striped Florals from Altenew
Sequins: Lilac Garden Flowers Sequins Mix from Pretty Pink Posh
Dies: Bejewelled Die from Altenew
Inks: Memento Tuxedo Black, Versafine Onyx Black, Picked Rasperry Distress Ink
Superfine Silver Embossing Powder by Ranger
Copic Markers: 0 - N0 - N1 - N3 - N5
Wink of Stella Clear Glitter Pen


GIVEAWAY
To celebrate this blog hop, Altenew will draw two winners who will each receive a $30 gift certificate to their online store. Also, Pretty Pink Posh will draw two winners who will receive $30 gift certificate to their online store. Winners will be randomly drawn from all comments left along the hop, comments must be left by Monday, Oct 26 11:59 EDT. Winners will be announced at Altenew and Pretty Pink Posh Blogs shortly after.

GET HOPPING
Your next stop will be incredible Joni Aldaya. Here is also the full list of participants.


Thank you so much for visiting. Have a great day and have fun hopping! Good luck!

Hugs,
Marika

Tuesday 20 October 2015

Just a Note

Hello,


I'm at the Altenew blog today to feature Painted Flowers set. I've seen such a beautiful cards made with this stamp set so this card was a challenge to try to come up something not that usual. What I haven't seen so many times is copics with this set - so I thought I'd give it ago. I added details with coloured pencils. Here is my card:


Stamps used: Painted Flowers and Lace Up.
Stamps used: Painted Flowers and Lace Up.

You can watch my video tutorial here or in HD in YouTube. 


Supplies:
Stamps: Painted Flowers and Lace Up.
Inks: Altenew Crisp Dye Inks Soft Lilac, Lavender Fields, Deep Iris and Jet Black, Hickory Smoke Distress Ink
Paper: Neenah Solar White 80lb, Linen Effect paper 150gms by WHSmith 
Sequins: Pretty Pink Posh Metallic Silver, Assorted Moonlight by SSS
White Thread

Thank you for stopping by today. See you soon!

Hugs,
Marika

Tuesday 13 October 2015

Warm Winter Wishes

Hello,

I'm here to share a quick post. I made this Christmas Card a few of the challenges in mind.   Last time when I made a card with some fun challenges in mind, I had so much fun that I decided to repeat it. :) There is a challenge at Inkspirational which has a theme "Glow" and at the Muse: ChristmasVisions there is this beautiful Christmas card by Kimberly Wiener to inspire us. At this time of the year, the word glow brought "the first snow" into my mind and how it kinda "glows" when it first arrives. I took the colour theme and the snowflakes from Kimberly's card - my flakes are bit smaller though. And of course, I share this over at Kathy's 30 Day Coloring Challenge. Here's my card:

This is my entry to the Inkspirational #93 and Muse: ChristmasVisions #23.

The adorable bear is from Purple Onion Designs by Stacey Yacula. He is called Bubbly. I've coloured him with copics and I had a little fun with Glitter Embossing Powders as well. I used SSS Falling Snow stencils to ink up my snow flakes and heat embossed them

Supplies: 
Stamps: Bubbly and Handwritten Holiday by Purple Onion Designs
Inks: Memento Tuxedo Black, Versafine Onyx Black, Stormy Sky and Chipped Sapphire Distress Inks, Versamark.
Stencil: Falling Snow by SSS
Embossing Powders: White Twinkle and Metallic Rich Gold Embossing Powder by WOW!, Opaque White Embossing Powder by Zing!
Copic Markers: E40 - E42 - E43 - E44, RV32, RV00

Thank you for stopping by today! See you soon!

Hugs,
Marika


Monday 12 October 2015

A winner of the Altenew October Blog Hop

Hello Everyone,


I'm a bit late announcing the winner of last week's hop, thank you so much for your patience. But finally here she is. I used Randon.org True number generator to draw a winner and she is the 90th comment left on my comment box:


---


I am so much impressed with your talent! All of your creations are so elegant with great color combo, designing, hard to pick fave one! Would love to follow you to see more of your creativity!
---
Thank you Vinita for your kind comment and thank you all for leaving so much love and support. Really loved reading through all of them. Vinita, I have messaged you, hopefully the message finds you.

Thank you all who participated on the hop!

Hugs,
Marika

Saturday 10 October 2015

Autumn... the year's last, loveliest smile

Hello!

Hopefully you all are doing well today. I'm here to share this card that I made inspired by  Therese from Lostinpaper. Therese is one of the first crafters and Youtubers that I started to follow. I immediately fell in love with the cute critters that she featured in her cards.. And if you wonder.. yes, they were those adorable critters by Stacey Yacula. I've also learned so much from colouring just watching her colour in her amazing videos. And yesterday, can you believe, is the day that I can call her as my teammate as SHE joins in the Altenew Team! How wonderful is that? I couldn't be more pleased and thrilled! Welcome Therese! 

I wanted to celebrate this day by being inspired her cards and there are so many that I could take inspiration from. But lately Therese has made two these two cards (here) and (here) with birds in them, so I needed to go for the birds theme. Then I saw this challenge at TIME OUT Card Challenge #41 and figured this could be a good fit to there as well. 


I used Wild Hibiscus and Vintage Flowers set from Altenew to stamp and colour the main bird at the bottom. Then I drew the three flying birds first with a pencil and then coloured on top with Faber-Castell Polychromos. (Sorry for smutch on one of the birds, I messed up the colouring, tried to erase it but Polychromos doesn't quite erase that well.

Thank you for visiting, see you soon!

Hugs,
Marika


Tuesday 6 October 2015

Coloured Pencils on Vellum

Good Afternoon!

I'm sharing a card at the Altenew blog today. I used Wild Hibiscus set and first I stamped the flowers on vellum and then used my coloured Pencils to colour the flowers. Here is my card:


Stamps and dies used: Wild Hibiscus, Sketchy Landmarks and Vintage Flowers die.
Here is my video on tutorial. Hopefully you find it helpful.


Supplies:
Stamps: Wild Hibiscus and Sketchy Landmarks by Altenew
Dies: Vintage Flowers die by Altenew
Inks: Versamark, Altenew Frosty Pink and Jet Black Crisp Dye Inks
Card stock: Neenah Solar White 80b
Pink Vellum by Inspire Me
Clear Droplets by Pretty Pink Posh
Silver IrRESISTible Pico Embellisher by Tsukineko

Thank you for stopping by today. See you soon!

Hugs,
Marika

Monday 5 October 2015

Card Concept Challenge #40 - Forest Friends

Hello!

I'm here to share card that I made for Card Concept Challenge #40 - Forest Friends in mind. I just couldn't resist the adorable inspiration picture they had this time. I'm running so close to deadline that I need to get this quickly published. I'm also playing along Kathy 's The 30 Day Coloring Challenge. Here's my card - pretty simple scene and one layer card. 


This is my entry to the Card Concept Card Challenge #40.
I used Stacey Yacula's images: Bobby2 Forests and Blossoming Perch and drew the swing.  The sentiment is also from Purple Onion Design from a set called Hopscotch Sentiments. I coloured the images with copic markers and for the background I used Distress Inks.

And I'm linking this up to Clean and Simple category.

Thank you for stopping by and I appreciate all the lovely comments left to me. Thank you so much!

Hugs,
Marika

Friday 2 October 2015

Altenew October 2015 Blog Hop

EDIT: I have announced the winner, please visit here. Thank you. 

Good Afternoon Everyone,


Today I'm participating Altenew October 2015 Blog Hop to celebrate the release of twelve new Crisp Ink colours and a variety of new Dies. You probably just came from the newest member of our Design Team Svitlana Shayevich's blog, if not please start from the beginning at Altenew blog and see what other members of Altenew's design team have come up with. 


I played a bit of Poinsettia and Pine set with co-ordinating dies. I also used a couple of new inks to stamp the images and inked up the background. Have you started you Holiday cards yet? Hopefully I'll give hint of inspiration to start to have fun with them.

Stamps and dies used: Poinsettia and Pine and co-ordinating die,
Wood Pallet Background and Sketchy Landmarks.

Stamps and dies used: Poinsettia and Pine and co-ordinating die, 
Wood Pallet Background and Sketchy Landmarks.

In this other card I used the pine cones to be my focal point.


Stamps and dies used: Poinsettia and Pine and co-ordinating die
Wood Pallet Background and Sketchy Landmarks.

Stamps and dies used: Poinsettia and Pine and co-ordinating die
Wood Pallet Background and Sketchy Landmarks.


I used no-line colouring technique in these images. First, I stamped images with a light inks: I used Cotton candy for the Poinsettia and Peach Perfect for the Pine cones. Then I added my base layer with copic markers. Then I took out my Faber-Castell Polychromo Colour Pencils and added detail with them. On the Poinsettia card I used the new Dark Chocolate Ink to stamp the pine needles - for the pine cone card I used Evergreen to stamp them. 


I used Wood Pallet Background to stamp the woodgrain on to a Desert Storm card stock with Dark Chocolate Ink. I cut them to frames with my paper trimmer and added a bit of worn out look with Gathered Twigs Distress ink with my ink blending tool. On the Pine cone card I uses Dark Chocolate and Peach Perfect ink to add a bit of interest to the background. 


The sentiments were stamped from the Sketchy Landmarks set with Altenew Dark Chocolate Ink. 

Copic Markers: 
Poinsettia and berries: RV11 - RV32
Leaves: YG03 - YG67
Pine Cones: E23 - E47

Faber-Castell Polychromo Colour Pencils:
Madder Lake (129), Madder (142), Walnut Brown (177), Burnt Sienna (283),Green Yellowish (168), Green Opaque (174), Juniper Green (165).

---

For my third card I wanted to show you the variety of ink colours. I tried to come up with a card that a teenager might like. 


Stamps and dies used: Halftone Hello and co-ordinating die
Label Love and Shutter Cover Die.

I stamped the Halftone Hello with Altenew Crisps inks Soft Lilac, Lavender Fields and Deep Iris. I started from the bottom of the stamp and used my stamp positioner to get the repeated stamping to line up. Between the colours and let the inks overlap a little bit. If you have MISTI, this would be fun and easy to do. A tip: start from your darkest colour and go for lighter ones. I die cut the Hello sentiment with the co-ordinating die. I also stamped How R U with black pigment ink and cut it with my scissors and left a tiny white border to get contrast.

Then I die cut my front panel with a new Shutter Cover Die (I trimmed it down to be a square.) and used new Altenew blue inks to ink up the front ombre. The inks used from the bottom to the top: Sea Glass, Ocean Waves, Dusk and Desert Night. The back of the shaker window is made by dry embossing with the same Shutter Cover Die. I used the same inks on that panel but in reverse order, I also rotated the panel 90 degrees to get the embossing to be seen better. I kinda like the effect this gives. And as you can see, the inks blend perfectly!! For purple ombre I used the following inks from left bottom corner to the upper right: Midnight Violet, Deep Iris, Lavender Fields and Soft Lilac. I created my shaker window from acetate and black fun foam. For the shaker material I used Metallic Silver and Charcoal Sequins. (Yay!! My first ever shaker card!) :)


GIVEAWAY
To celebrate this release, Altenew will draw three winners who will each receive a $30 gift certificate to their online store. Please leave a comment on the Altenew blog by Friday, October 9 11:59pm EST for a chance to win. The winners will be announced on Saturday, October 10.

And there is more! I will randomly choose a winner from comments left on this post and the prize will be $30 gift certificate to Altenew online store. Please leave a comment on this post by Friday, October 9 11:59pm EST for a chance to win. I will announce the winner here on my blog on Saturday, October 10

GET HOPPING!
I was the last one on the hop this time. You can visit Altenew and let Tasnim and Jennifer know what you thought of this release and enter the big giveaway by doing so. I hope you enjoyed hopping and got some inspiration. 

Thank you so much for visiting and taking the time to comment. See you very soon!

Marika